Showing posts with label Artistic Stamper. Show all posts

Wednesday, 25 September 2013

Autumn Leaves

Hello blog friends, welcome to my blog.  Right now the blog posts are like buses - you wait ages for one and then three come all together.  There are reasons - one being that, this month, I have been working on some detailed projects (yet to be seen as part of my DT duties at LOC).  Another reason is that real life gets in the way - and sometimes unreal life (the sewing machine is out again as other half wants a steampunk costume made up - did you know it's really easy to buy a pith helmet on the internet?)
So, here is my contribution to The Artistic Stamper Creative Team challenge blog this month.  The theme is autumn, so I've gone for shades of yellow and green.  

I began with a large tag and  blended some DI's over the area I wanted to stamp the leaves in the foreground.  I've had these stamps for AGES - they were some of the first I ever bought and I'd more or less forgotten them.  I kiss-stamped them first (a technique I hadn't used for a long time) onto texture stamps (from the Artistic Stamper - I used dogtooth, hexagon and sequin waste textures)  and then went over them with a Versamark pen (not very expertly!)  and glazed them with clear detail embossing powder.  

After that I blended more shades of DI over the background and went back with the leaf stamps, stamping two or three generations with Memento ink.  Because I'd glazed the leaves in the foreground I didn't have to mask them but just wipe them - cool, eh?  I finished by stamping the words.

I'm also entering this in
Our Creative Corner - Forgotten things (the stamps, kiss stamping technique)

Thank you for visiting.  See you soon!

Crafty Hugs,

Keren

Sunday, 21 July 2013

Time gone by

Hi blog friends, and welcome to my blog.

As I'm writing this, the British Summer has arrived - although storms are promised for later this week - and a summery feel has crept into this little panel, which will form the focus of a scrapbook page.

I started with the photograph, which is of me with my two sisters.  I'm the two-year old toddler;  my elder sister is holding my little sister, who is decidedly unhappy about the whole proceedings - probably because she's too hot, being wrapped up in a woollen shawl.  We're sitting in our back yard, and it would be around June or July 1957.  My father was probably the photographer. 


I printed it twice, and cut out the figures of my sisters and myself to layer up over the background.  I prepared the panel with a faux wood effect (one of Andy Skinner's Timeworn Techniques) and die-cut a circular aperture.  While I had the Big Shot out (who am I kidding?  It never gets put away!) I die-cut the clock face (Tim Holtz Alterations) and the cogs (ditto) and the letters (ibid). 

I used two different techniques for the rust effect.  For the clock face and cogs, I gave them a coat of PVA glue mixed with some sand to get a  pitted texture.  Once they were dry, I painted them with dark brown paint and finally rubbed some gilding waxes lightly over the surface. 


The letters got a different technique.  I coloured them with Vintage Photo Distress Ink, and then sprinkled on Vintage Photo Distress embossing powder, heated it, and finally rubbed away the release crystals. 

I stamped the panel with a hexagon texture stamp from the Artistic Stamper, using Mushroom Adirondack ink.  I stuck the clock face around the aperture, and put the photograph behind, with the cutouts popping out of the frame.  I played about with the position of the cogs until I hit on the idea of using them to make a "sun" .  I stamped the words "If I could turn back time! and "Time machine" using my trusty £1 alphabet and Coffee Archival ink.  Finally, I glued a scrap of net, which I'd soaked in runny brown acrylic paint, and stuck the letters onto a length of chain which I'd dipped into the same runny paint and then baked in the oven to cure. 

The last process was to stick the chain letters (geddit?) to the panel. 

I'm entering this into the following challenges -

Sandee & amelie's Steampunk Challenges - Rust
Our Creative Corner - Captured Memories
Country View Crafts - Summer Sizzler
The Artistic Stamper  -  Ladies Day

Thank you for visiting - come again soon, why don't you?

Crafty Hugs,

Keren

Sunday, 9 June 2013

Precious Time

Hello blog friends, and welcome to my bit of the Blogiverse.  With Father's Day fast approaching, there are quite a few blog challenges that have set masculine/father type criteria.  And as Craft Supervisor Mysti is scrupulous in her observance of Father's Day, quite apart from bring Daddy's Cat and having missed him TERRIBLY when he was in hospital recently - well, something had to be done!

The Love of My Life loves pocket watches;  he has quite a collection. So when the Alterations Pocket Watch die came out, I had to get it - and it was just perfect for this year's FD greeting.

Open the cover and inside -
The cat face stamp is from Stampendous and the kitten has been stamped with a Creative Impressions stamp and the cut out from its background.  Open the inner frame-
to reveal the concertina fold album inside, featuring CS Mysti herself!  (she's going to get me to write a special message inside!)

If you'd like to see the "How I did it", you can see the details here -

This is being entered into the following challenges -

Anything But A Card - Masculine

Thanks for visiting!

Crafty Hugs,

Keren

Monday, 29 April 2013

SIlvery Moon

Hi all, welcome to my blog.  Thank you for choosing to spend some time here, I really appreciate having your company.  Today I am sharing a page from my Goddess book, which I began last year.  Today's page - which I am going to enter in the Artistic Stamper Creative Team Challenge Blog ("Texture") is dedicated to Selene, the Moon goddess.


I started with a page from a Kraft board album (from Papermania) and covered it with canvas, which I coloured with Distress Stains in Faded Jeans and Dusty Concord.  Then I sprayed on some Mr Huey's ink (Passport) and Radiant Rain (Pewter) to darken it down.

When it was dry, I spread a nice thick layer of silver Ferro paint over the top left corner, sprayed my swirl stamp (a foam one designed for stamping on walls!) and pressed it into the Ferro to get a good impression.  While everything dried, I moulded a crescent moon from white polymer clay and stamped the word "Selene" onto frosted shrink plastic using Platinum Planet Brilliance ink.  I also used the Brilliance ink to stamp the honeycomb stamp, which I used unmounted, onto the background.

To finish it all off, I highlighted here and there with Pearl  Moon Metallic gilding wax from Creative Expressions (love the turpentine smell!)  And that was it, finished just in time to enter the April Challenge (nothing like leaving it to the last minute, is there?)

Crafty hugs

Keren


Sunday, 3 March 2013

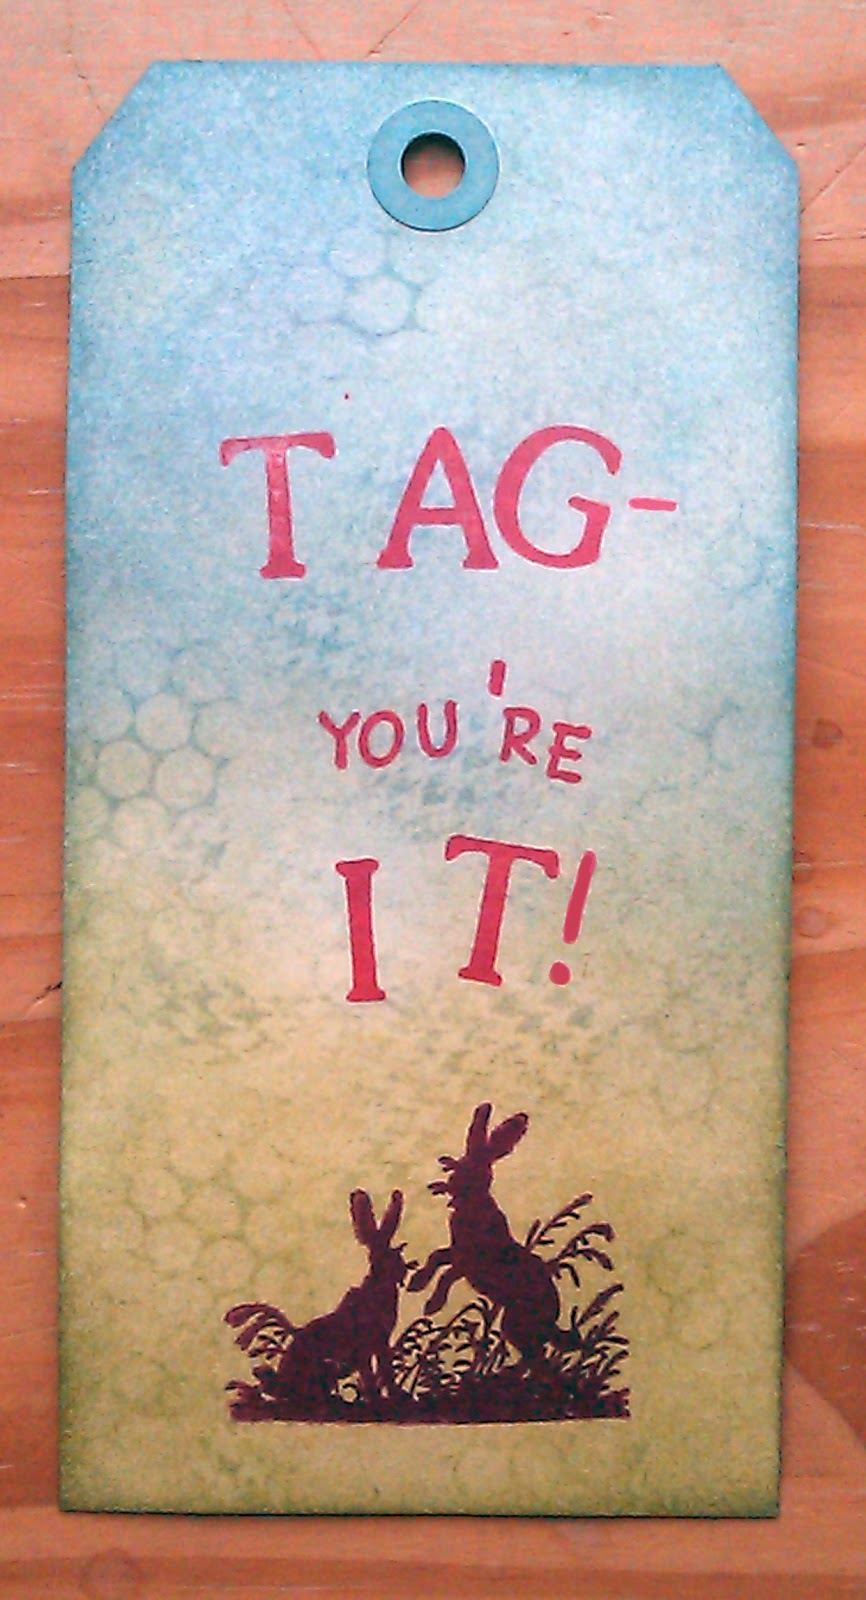
Tagging along

Hi everyone, and welcome to my blog!  It's good to have you visit, and I hope you enjoy yourself while you're here.  Now, if you think I'm going to miss an opportunity for a play on words, you think wrong.  And when The Artistic Stamper Creative Team set "Tag" as their blog challenge theme for this month's challenge, well...it just had to be done, didn't it?

This took me back to my childhood;  we loved playing chasing games when I was small.
(Actually, we didn't play "Tag" in my part of the world. We called it "Kit". But it was the same game.)

I wanted a nostalgic, 1950's-postwar-schoolbook feel for the tag.  I began with a rummage in my collection of alphabet stamps, and stamped out the letters in Vermilion Archival ink.  (I love red, it's my favourite colour).  The March hares were a free covermount from Craft Stamper - they reminded me of the kilnd of illustrations that appeared in children's books in my childhood and I thought they looked as if they might be playing a game too, so I stamped them in Coffee Archival. 

Once that was done, I took Cloudy Blue Adirondack ink and two Artistic Stamper unmounted background stamps (sequin waste and houndstooth) and, using them without a mount, dabbed them more or less randomly across the background.  Finally, I blended Broken China, Peeled Paint and Weathered Wood Distress Inks over the background.

And that's it!  Hope you like it. 

Thursday, 14 February 2013

Feel the Love - 2


After making a fancy box to contain my husband's Valentine gift, (see part one if you haven't already)  I went on to make the card.  The card which will go in the box (on top of a little gift!) was next - I folded a square Kraft card blank and positioned a heart shaped die (one of the Sizzix Framelits Heart 1 nesting dies) carefully so that it just missed cutting the fold.   I stamped the front with a Rose background stamp in Brilliance ink - it didn't show up as well as I would have liked, so I brushed over it with gold Perfect Pearls and misted with water to set the powder.  I shaded the edges with Vintage Photo Distress inks.  The effect is subtle and doesn't show up well in the picture - it's more obvious in real life, as is the "I Love You"sentiment stamped in brown Memento ink.  


I'd made three roses (see here for the method I followed) that I was going to put on the lid of the box but changed my mind.  One of them went on the front of the card with a couple of the small metal leaves from Creative Expression.  The rose and the leaves got a coat of Gilder's Paste.  Gilder's Paste is fantastic stuff, it looks and smells like shoe polish, is non-toxic,dries in about 20 minutes (is touch-dry in next to no time) and goes onto almost anything!
  
And that's it done.  I'm sharing it on the Artistic Stamper Blog Challenge for February.  Hope you liked it!  Thanks for visiting - please come back soon!

Friday, 18 January 2013

Lilith

Today, gentle visitor, you find me at home, due to the office being closed because of the snow.  Yesterday I had a day of waiting in for the delivery of my new freezer,   because my old one popped its clogs on Sunday - fortunately there wasn't much in it and I noticed that it had stopped working in time to transfer what was there to my small freezer and defrost it before it created a lake on the kitchen floor.

While  I waited, I have  my time (a) cleaning the kitchen floor where the old freezer stood so that they don't think I'm a complete slob (even though I am) and (b) finishing off the project that was on my desk on this week'a WOYWW.

 
I've called this one "Lilith".  According to some, Lilith was Adam, the first man's first wife, created at the same time from the same earth - but she wouldn't obey him and left him, so was replaced by Eve.  She's considered to be a bit of a naughty girl as a result! 
 
I'm in a "stamp and mask" mode at the moment.  The Gibson Girl was stamped first, onto the tag and a Post-It.  Cutting out the Post-It mask was a bit fiddly, so I put a bit of Quickie Glue on the delicate bits and let it dry (so it would be repositionable) then put it carefully over the stamped imaged.  I stamped and masked the bat wings, and finally the tiled floor, which is my trusty Harlequin background (from CaroLines) turned sideways.  That was easy to mask - I just stuck the Post-It straight over it.  I used Memento ink because I knew I'd be using my alcohol-based pens to colour in.
 
Then it was just a matter of colouring the background with Distress Inks (Wild Honey, Ripe Persimmon, and Spiced Marmalade, with shadows in Weathered Wood), using Colour Dusters.  I flicked water onto the background and blotted it with a paper towel  to get the speckled effect.
 
Finally, I removed the masks and coloured the Gibson Girl with Spectrum Noir pens and stamped "Lilith" using my 99p a set alphabet stamps to finish the job.
 

I'm rather pleased that I can enter this one into two blog challenges.  It was originally designed for Haunted Design House's  Macabre Monday challenge, but as it features my favourite stamp - that Harlequin pattern, which features in a lot of my stuff - it also qualifies for the Artistic Stamper Creative Team blog challenge.  Bargain!

Saturday, 20 October 2012

Twinkle, twinkle

"Twinkle, twinkle, little bat!
How I wonder what you're at!
Up above the world you fly,
Like a tea-tray in the sky."
(Lewis Carroll - Alice's Adventures in Wonderland)

The Altered Alice's challenge this month is to create something that twinkles or shines, and by happy chance Tim Holtz's tag for October uses glitter (Tim uses glitter!  Whatever next?), so it's one stone, two bats for this one.  I used a background stamp from The Artistic Stamper (Sequin Waste) as I didn't have a cobweb stamp (how did I let that happen?) but I think it works OK!
 
Hallowe'en is my favourite festival of the year.  When I was a child, the emphasis was more on Guy Fawkes night (we used to have HUGE bonfires in the village) and because legislation was a lot looser then going out at night was positively hazardous from the end of September until November 5th due to fireworks going off (usually "bangers").  It's probably just as well that we make a bigger deal of Hallowe'en now.  I've got all sorts of plans for this year..
 
Update - Honourable Mention at The Altered Alice - thank you so much!


Thursday, 26 July 2012

What goes around..

...comes around, or so they say.  A few years ago bottle tops were IN.  We were all flattening them at the drop of a hammer and using them in our crafting.  Then they went out of fashion, as we all moved on to other things. 

 I came across a bag of  them, bought from the home-brew shop ages ago, and decide that they would be great as jewellery, and as they are circular, they would qualify for inclusion in the Artistic Stamper Creative Team Blog Challenge for July


I flattened these with my Big Shot, then gilded them with antique gold Rub 'n' Buff.  I made the holes for the jump rings with my Tim Holtz drill punch - it was slightly less fiddly than the Crop-O-Dile.  For the inserts, I stamped a text stamp onto plain white paper with Flitterglu- Jinkies, that stuff is STICKY-and applied gliding flakes.  Then I went and washed the Flitterglu off my hands.  I coloured my stamped and gilded paper with Butterscotch Adirondack and Tea Dye Distress Ink pads, then die-cut the circles to fit into the bottle tops, and went to wash the Flitterglu off my hands. 
Last job before assembly was to stick the paper discs down and cover them with clear epoxy stickers (remember them?)    After that I washed the Flitterglu off my hands, linked the bottle tops together with some chain, and ta-dah!  a necklace fit for Lady E!